When it comes to outdoor cameras, image analysis for motion detection is not reliable. If I set the camera to email me when motion occurs, I was getting lots of emails daily or I was missing events.
So the best answer for me is to record on motion so you have the footage recorded and rely on outdoor motion sensors to notify me of events and upon notification, I can check the cameras live or review the recorded footage later.
The DSC LC-151 is a relatively low cost, outdoor wired motion sensor with PIR and microwave. On paper, the specs give you everything you would expect a good motion sensor to have.
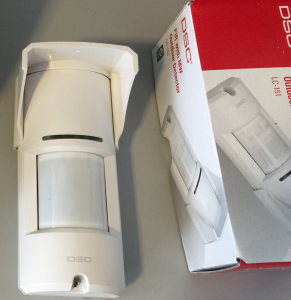
Features:
- Temperature compensated quad PIR sensor with sensitivity adjustment
- 10.525 GHz Microwave with intensity selection
- Dual tamper switches
- Wired interface with NO & NC contacts
- IP65 rated enclosure
- Pet immunity lens included
Product Breakdown:

Internally, the circuit board has the microwave sensor up top, the PIR sensor in the middle. There are 3 LEDs on the board for setup. Also notice the yellow sensitivity adjustment for the PIR and a simple HIGH/LOW selector for the microwave. There is a tamper switch on the left and the connection block is on the bottom, above the wire entry hole. The screw on the bottom is to secure the housing to the mounting bracket. The hole next to it is to secure the two halves of the housing together.
The sensor is a quad-PIR sensor, but it is really 4 sensors in a single sensor package, so you don’t get the benefit of having multiple sensors that have multiple points of view.
Externally, there is a rigid stainless steel mounting bracket which attaches to a wall and the 2 piece housing. The plastic is off white, which actually matched very well with the color of the wall I mounted it on. There is also a separate clip on shade piece that protects the lens from rain or snow.
The PIR lens is multi faceted and comes with an internal, removable pet immunity lens mask. The housing is perimeter sealed with a rubber ring.
The housing is sealed very well for outdoor use. Where the wire comes into the housing, there is a foam rubber block to seal the cable entrance.
Above the PIR is the LED lens. The green LED indicates PIR, yellow indicates microwave and red +grn + yel indicates alarm.
Installation:
Following the instructions, I mounted this about 8 ft above my driveway to detect vehicles coming up my driveway and people walking up the driveway. I tied it into my alarm system as a monitor only zone and had it set to chime when it detected someone.
Installation for me was simple, I mounted it to my garage wall and ran the wires internally to the alarm and power supply.I used a 12V power supply, this device only draws 24mA (less than 1/2 watt).
Once I drilled a 1/4″ hole in the stucco using a carbide tipped masonry bit, I ran a piece of Honeywell 22/4 (Genesis 11045801). I then marked the 2 holes for the anchors. Unfortunately, I thought the big hole in the center of the mounting bracket was for the wire to go thru. I realized later, the hole is for the rear tamper switch. So I plugged that hole with an extra anchor which set the rear tamper switch. Measure twice, drill once.
My favorite anchor is the Toggler Alligator AF6 and I use #6 or #8 stainless steel screws. I usually toss the included screws and anchors.

Once the bracket is attached to the wall, I drill another hole for the wire in the area where I could run the wire down the bracket to where the cable enters the housing. The hole and cable will be fully covered by the housing. This protects the cable from getting snipped by the bad guys.
Then I mounted the rear half of the housing, which contains the circuit board. It mounts by hooking on to the stainless steel bracket and a single screw to secure it. It is a strong, durable mounting setup.
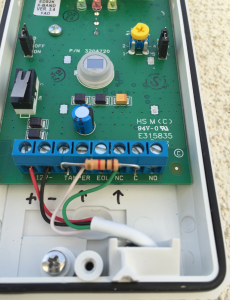
Next I wired up the sensor. I used RED/BLK for 12V DC power and YEL/WHT for the sensor NC. Since my alarm system (Ademco/Honeywell 4219 Zone Expander) requires a 1 kΩ EOLR (end of line resistor), I put it inside the housing. I also wired up the TAMPER to the NC in series. I could have ran 2 more conductors and wired TAMPER to a separate zone, but I don’t feel like I need to dedicate a zone to tamper as the sensor will trigger if someone tries to approach it. If they do tamper with it, then the zone will not reset.
The EOLR is best placed in the housing and not in the alarm panel. By putting it in the housing, if the bad guys snip the wire, the alarm will know. There is a spare terminal block position to allow you to easily wire the EOLR. I didn’t use it since I jumpered the tamper and alarm NC outputs together using the resistor.
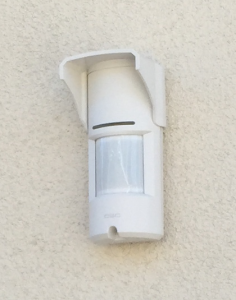
I installed this on a wall that gets morning sun and is in the shade by noon.
Testing:
With all motion sensors, you play around with the settings over the course of days or weeks to get it where you want it.
This unit gives you 2 options for the microwave sensitivity, high and low.
For PIR, you have dial that has about 6 discrete positions from low risk to extremely noisy.
I have a very challenging environment, the sensor looks across my driveway but beyond that is a grassy hill that gets lots of afternoon sun. When the wind picks up, the sensor goes nuts from the air thermals and the moving grass.
After testing settings, I eventually found that on the lowest setting for microwave and PIR, I was still getting too many false alarms. The good thing was it was picking up my car as I drove by 100% .
Unfortunately the false alarms makes this unit useless in my intended application in my particular environment. Although in a less challenging environment, it could work just fine.
This unit appears to be made for DSC by the CROW Group, based on the http://www.thecrowgroup.com/eds2000/.
Results:
If you have a application to use this sensor in a less than demanding location, compared to my setup, then it could work fine for you. Otherwise, I would recommend a dual PIR sensor, some of which I will be reviewing shortly.

I am debating between the LC151 and LC171 and am curious where you purchased yours.
Thanks!
Mark
LikeLike
Like many industries, the sale of professional items is limited to their distributors, who may not be DIY friendly. I find if I show up in person, they will sell it to me. When they ask for a company name, I say put it under cash. I only do that when I’m in a jam and can’t wait. Otherwise, I almost always order online.
I believe I got this on eBay or ElveSupply.
I do like the 171 much better.
LikeLike
Great review. I have two of those and I need to set down the IR sensitivity, but cannot find any info on the difference between setting it through the DIP switches or through configuration settings (the both offer 4 levels). Would you know?
LikeLike